LinkedIn profiles should be updated and maintained continuously. We believe in empowering our clients with the knowledge to do this themselves. Our LinkedIn profile writing services come with detailed instructions on how to copy and paste the content we have prepared for you into your LinkedIn profile. Once your LinkedIn profile content has been professionally written and optimized, you can follow the step-by-step guide below to easily update and build out your profile.
LinkedIn is the top social networking website for professionals. LinkedIn had more than 570 million registered users as of January 2022. The site adds two new members every second, and 106 million people visit the site each month. With so many members, the rate at which your network expands on LinkedIn can be utterly amazing. One hundred strategic contacts could mean access to millions of people in a short amount of time. You’d have to attend dozens — or hundreds — of in-person networking events to equal the reach you can get on LinkedIn.
LinkedIn allows you to leverage the power of your network — the people you know, and the people those people know — to help you connect to a person who can offer you a job. Executives from all Fortune 500 companies are on LinkedIn. Recruiters from every discipline and industry are on LinkedIn, with as many as 94% reported to use LinkedIn. More than 20 million companies have profile pages on LinkedIn.
Once upon a time, attending networking mixers, industry events, and Chamber of Commerce meetings were the best way to make new connections and build business relationships. Now, many of these activities have moved online within the LinkedIn community. Much like networking in person, professionals interact on LinkedIn with the explicit intention of making business connections. With LinkedIn, you get all the benefits of networking in person, with less of the hassle. Instead of going from business lunch to business lunch hoping to meet people, LinkedIn provides a platform for you to specifically search for and research individuals who you know will directly add value to your job search.
Employers and recruiters use LinkedIn to locate both active jobseekers and those who aren’t necessarily looking (passive candidates). They also use LinkedIn to vet job candidates before making an interview invitation or extending a job offer. Recent statistics indicate that 89% of recruiters say they have hired someone using LinkedIn.
LinkedIn also allows candidates to create an online portfolio of their accomplishments — by facilitating embedded video, links to content posted elsewhere on the Internet, and the ability to create highly shareable, long-form content in the form of LinkedIn’s “Publishing” feature.
LinkedIn gives you the ability to identify, research, contact, follow-up, engage, and maintain your contacts in one place. Its ability to facilitate business networking is unmatched by any other social network.
Your LinkedIn profile is a résumé, business card, and elevator speech all rolled up into one. However, your LinkedIn profile is not your résumé. LinkedIn is a personal branding page. You need both a résumé and a LinkedIn profile, and they should be in sync with one another, but not be exact copies. The information on your résumé should match your profile (in terms of positions you’ve held, your educational credentials, etc.), but the content you include on your LinkedIn profile will be different (sometimes vastly different and sometimes subtly different) from your résumé.
Even if you think you don’t know how or don’t have the skills to build out your profile we encourage you to try to follow the instructions we’ve provided so that you are empowered with the skills to do this in the future. Your profile is a living document and will need to be updated on an ongoing basis.
There are a few reasons that we provide the content for your LinkedIn profile rather than building out your profile for you:
- As noted above, it is in your best interest to learn how to update your profile so that you have the skills to regularly update it.
- It is against LinkedIn’s terms of service to allow anyone to log into your profile or to log into anyone else’s profile. Yes, this seems like an unnecessary rule and many have reached out to LinkedIn asking for it to be changed or clarified, but as of now, they have not done so. There have been instances of accounts being permanently suspended for violating this rule (both the account logged into and the account of the person who logged in). Yes, we wish they would change this. Unfortunately, we do not make the rules.
- When building a LinkedIn profile there is no “draft” function. Any changes or edits are live and available to the public immediately. LinkedIn content should always be drafted, proofread, and finalized offline before making any changes to your profile.
However, we do know there are some clients who really need help taking the content we’ve provided them and applying it to their profile. If this is you, for an additional fee there are ways we can assist, so please contact us.
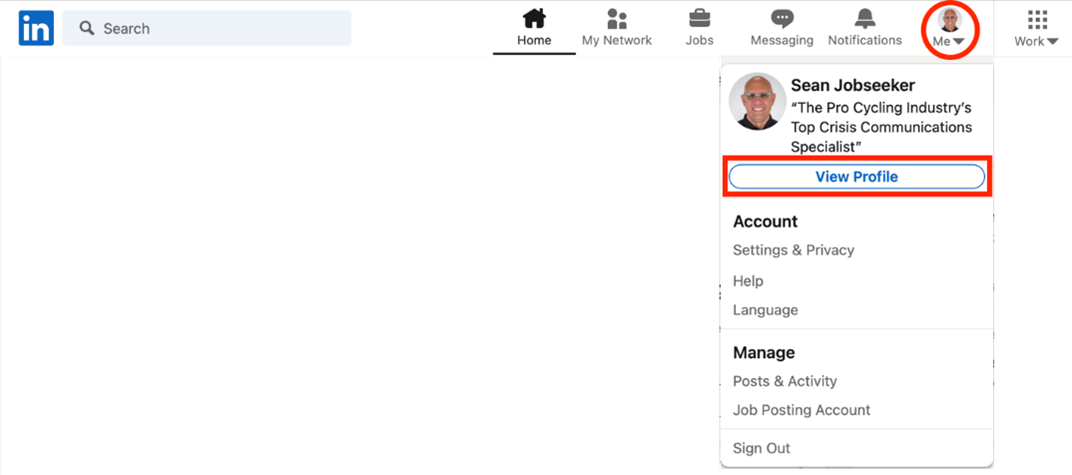
The first thing to do is backup your LinkedIn profile. You will do this twice — right now, so you have a copy of your LinkedIn profile before you update it, and again after you are finished updating your profile with the information in this document. This will save the content, only, in your profile (without photos and graphics).
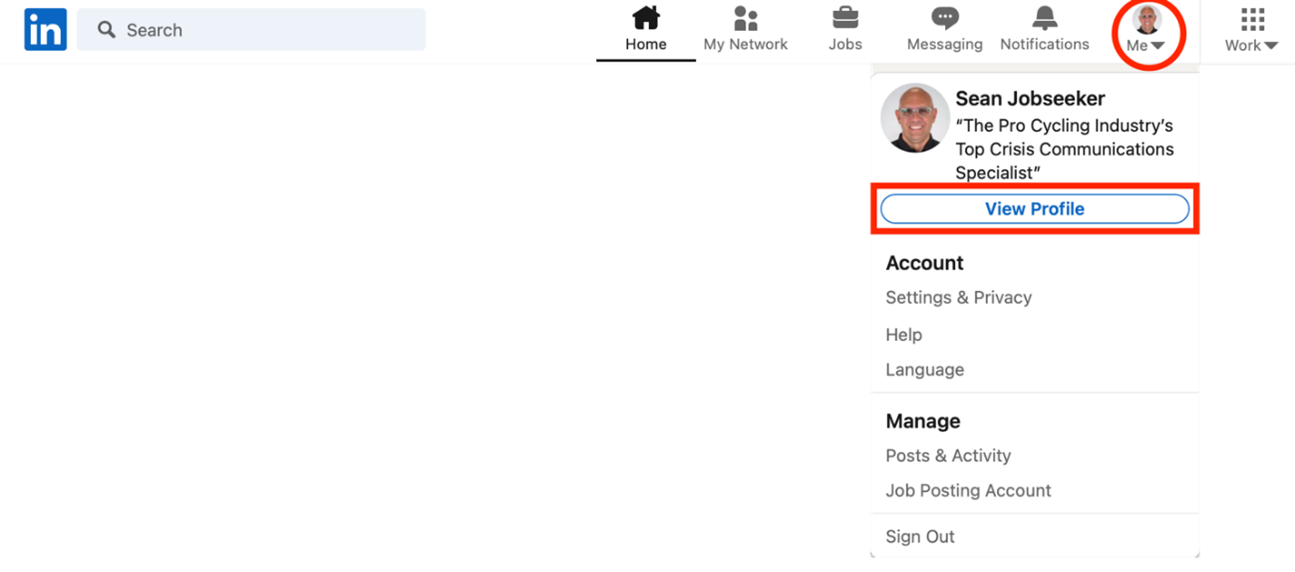
Using the menu bar at the top of the page, click “Me.” Click on the “View Profile” link on the drop-down menu. This will take you to your profile page.

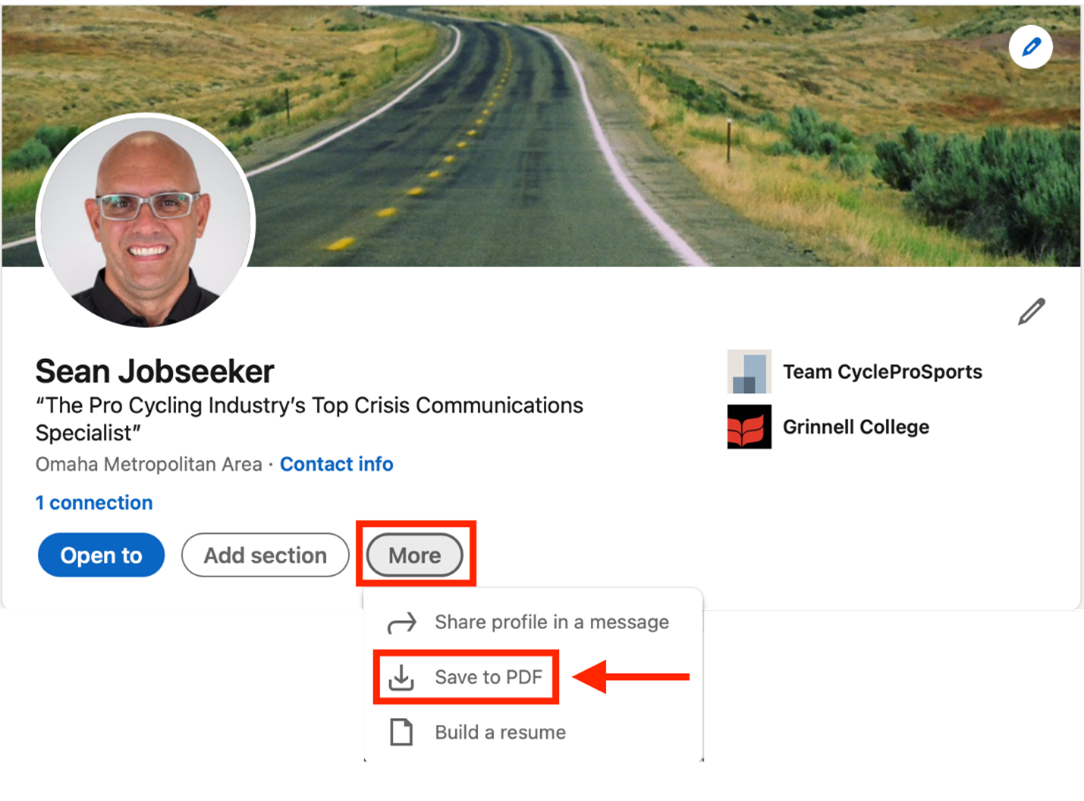
On your profile page, click on the “More” button next to “Add profile section” and click “Save to PDF” from the dropdown menu.
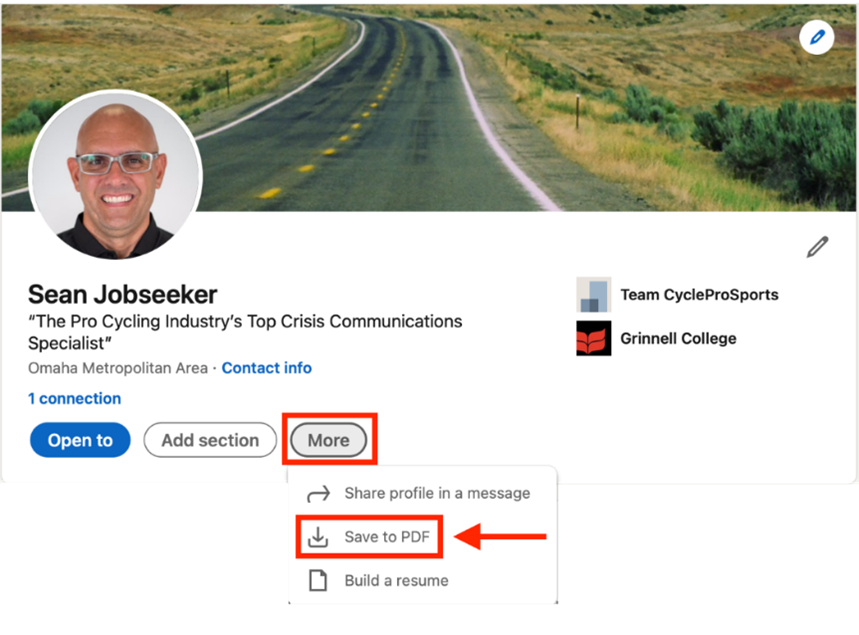
This will immediately save a PDF of your LinkedIn profile to the default download location on your computer.
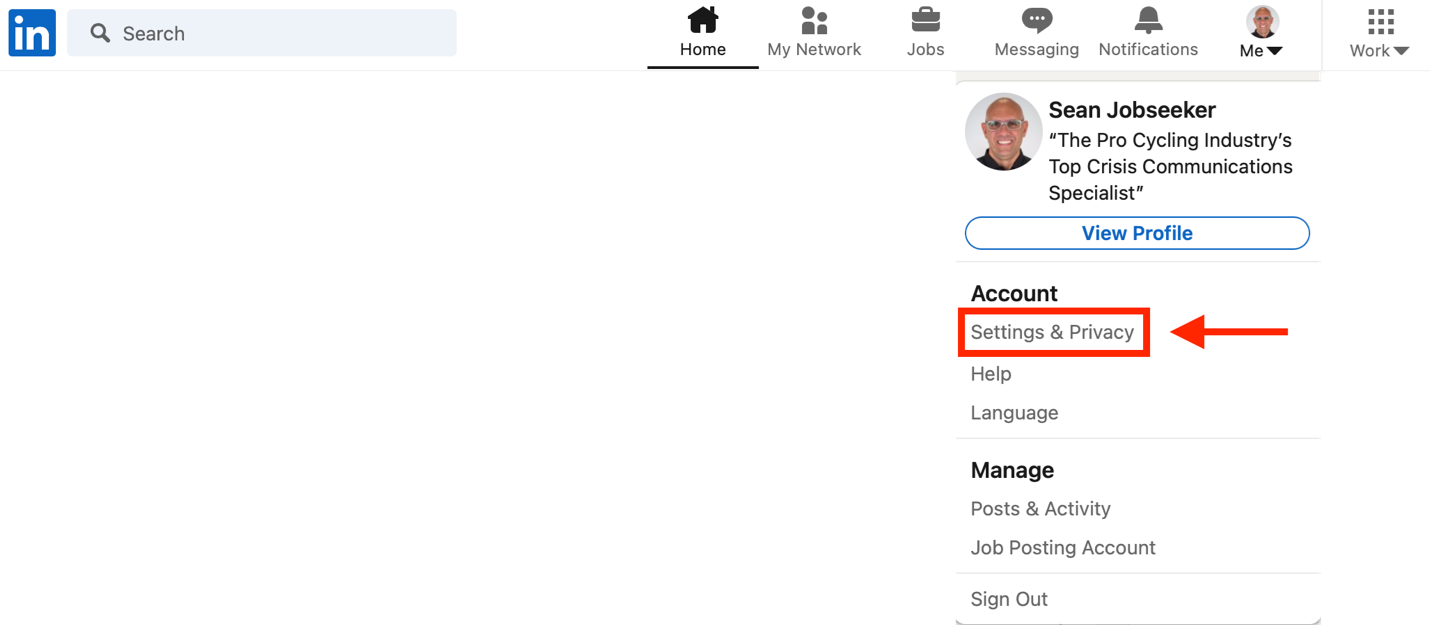
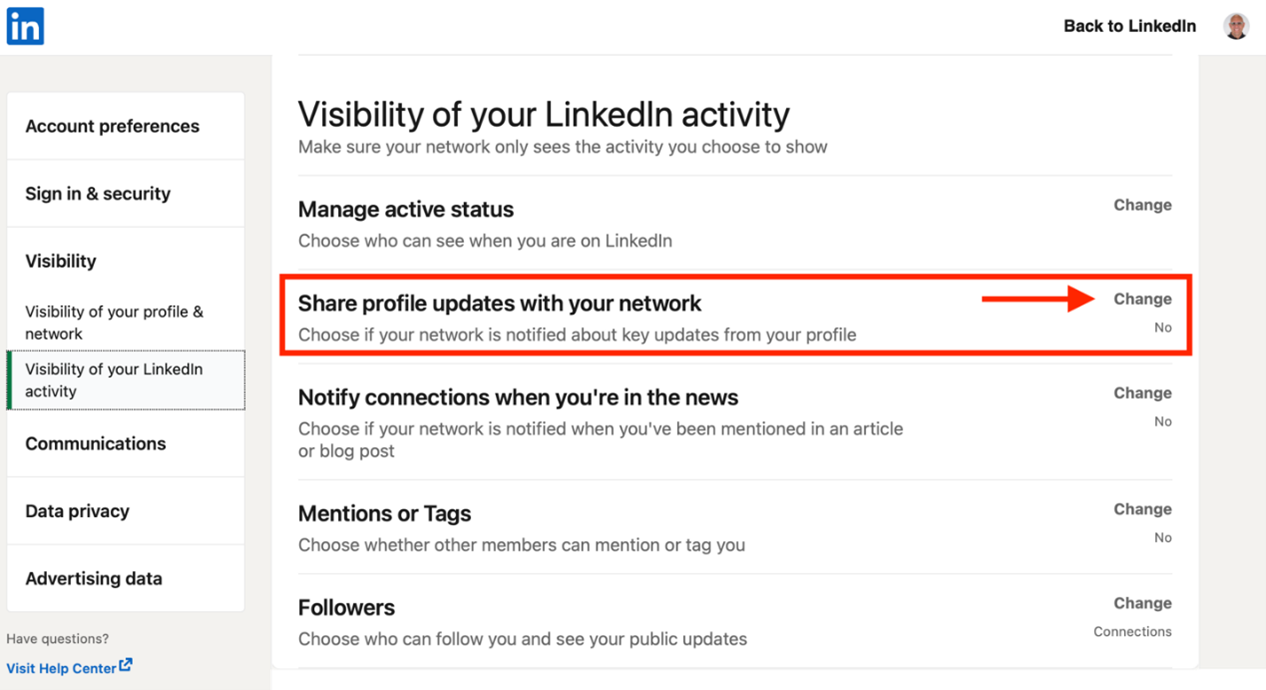
The second thing to do — before you begin updating your LinkedIn profile — is to turn off your Activity Broadcasts (visibility of your LinkedIn activity). This will ensure that your current connections are not notified of the changes you are making to your account. If you don’t turn off this setting, all your connections will receive notifications of every change you make to your LinkedIn profile.
On the main menu, below “Me,” click on “Settings & Privacy.”

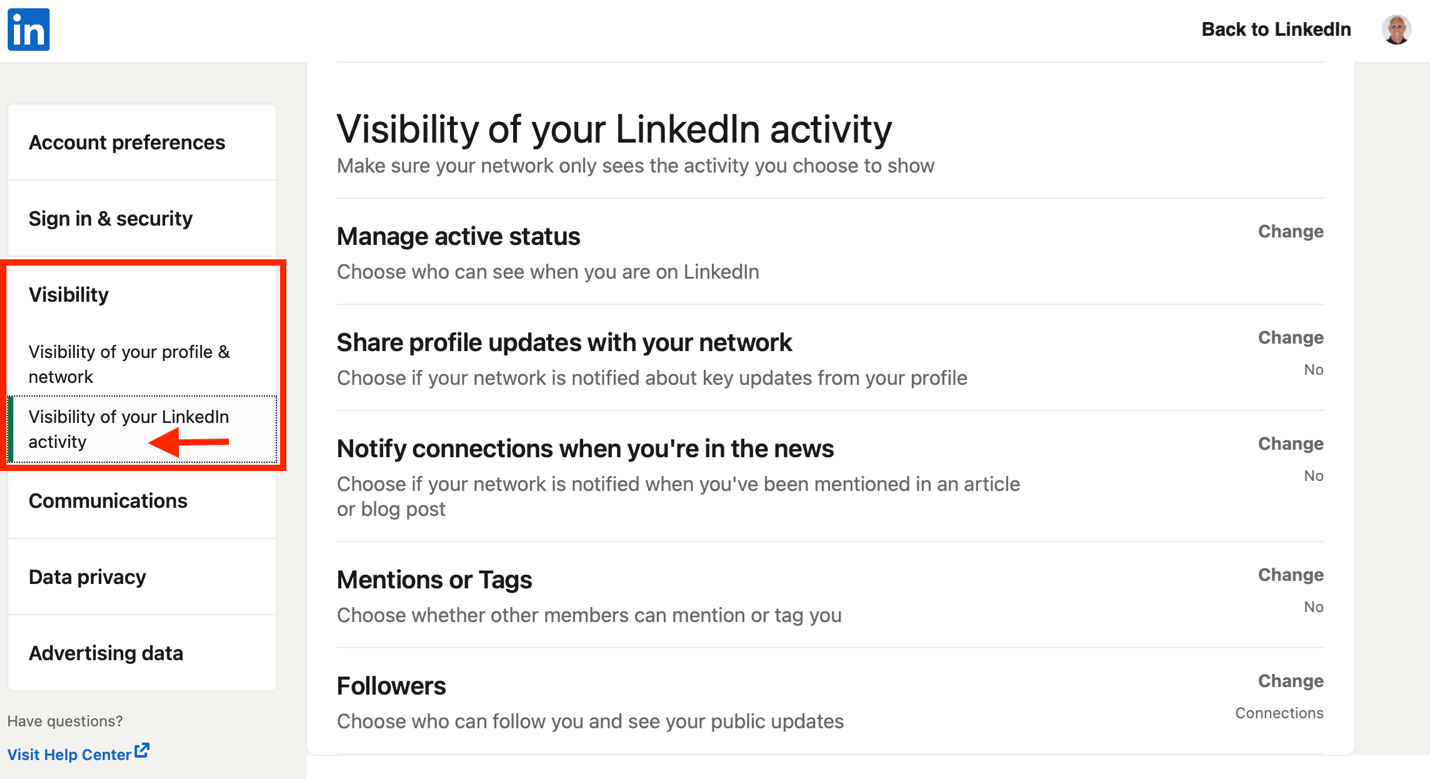
On the “Settings & Privacy” page, click on the “Visibility” link on the left side of the page. Click on the “Visibility of your LinkedIn activity” section.
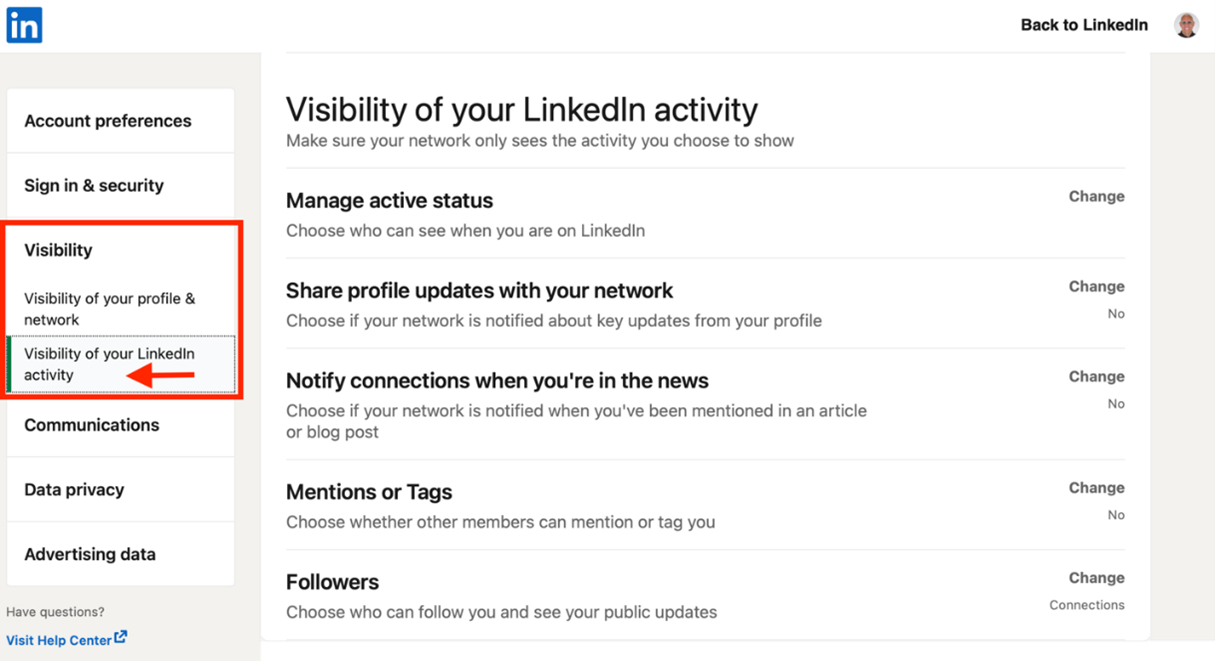
Look for “Share profile updates with your network.” Click on the “Change” link next to that item.

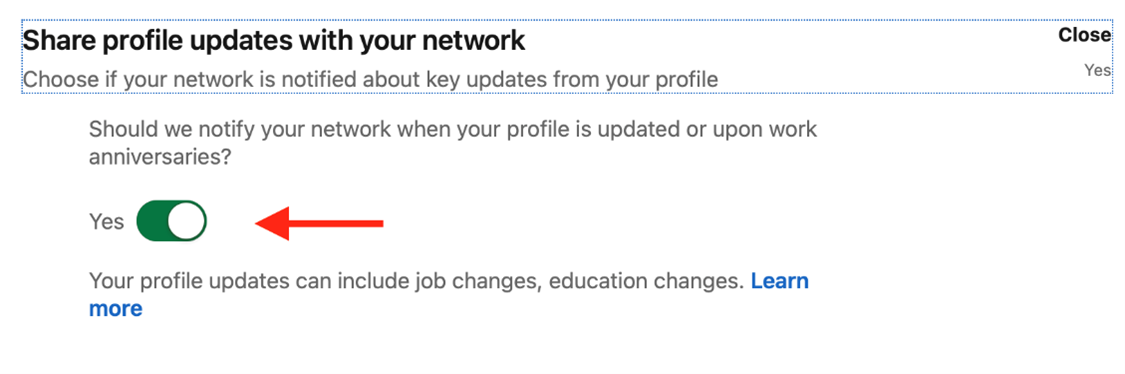
On the dropdown that appears, slide the box to “No” in answer to “Should we notify your network when your profile is updated or upon work anniversaries?”
Now that Activity Broadcasts are off, it’s time to edit your profile. Let’s start with “Edit intro.”
Name Field
LinkedIn’s Terms and Conditions prohibit pseudonyms, fake names, business names, associations, groups, email addresses, or special characters that do not reflect your real or preferred professional name in the name field. According to LinkedIn, “The name fields of your profile name may only include the first, middle, and last names of your real or preferred professional name, plus your preferred pronouns.”
LinkedIn monitors profiles for compliance, and your account is subject to restrictions and/or removal if you do not comply with the site’s terms and conditions.
Click on “View Profile” under “Me” on the main menu.

You’ll be taken to the “Edit intro” page where you can make changes to your name. LinkedIn has added a field for “Additional name.” In this field, you can add a former name, maiden name, or nickname. They have also added a feature that enables users to record the pronunciation of their name and a dropdown list to select your preferred pronouns.

Headline Field
On the same “Edit intro” page, you can also add or change your LinkedIn Headline as well as add or update additional information that appears in the profile section.
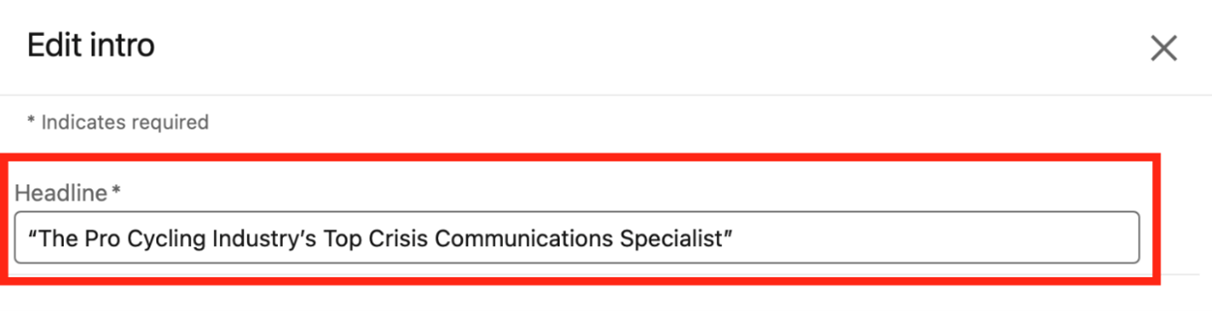
Your headline is limited to 220 characters. However, unlike your Name field, your Headline can include special characters and emojis, such as:
✓ ◊ ► ◄ ↔ ☆ ★ ♫ │ ▌✅
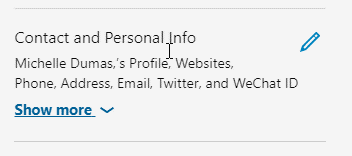
Contact and Personal Info
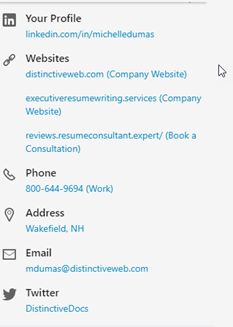 You want to make it easy for recruiters and prospective employers to contact you without having to rely on the limited use of the LinkedIn In-mail function. To the right of your snapshot area is a section for Contact and Personal Info. Edit this section by providing all relevant information.
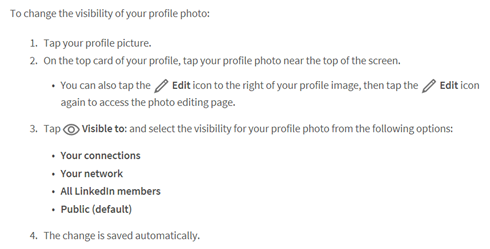
You can control who can see your profile photo. Posting a profile photo is optional, but it helps your connections and others recognize you. In fact, members with profile photos receive 14 times more profile views than those without. The default photo setting is Public.
Follow these steps to add or change your photo:
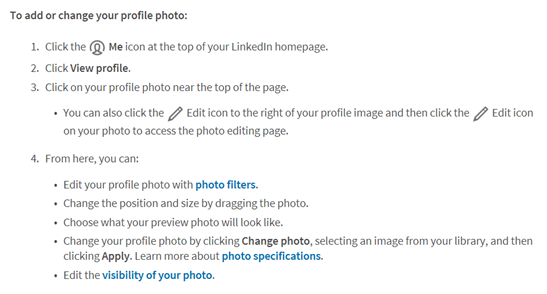
If you edit your profile photo visibility settings from your profile page, then your public profile page will be updated with the new setting. For example, if you change your profile photo visibility setting from Public to Connections Only, that change will be applied to your public profile as well, and your photo will no longer appear as part of your public profile. Likewise, you can update your photo visibility settings while you are editing your public profile page (or by disabling your public profile).
If your public profile is disabled (visible to no one), your profile photo visibility setting cannot be set as Public.
You can also add a background photo to your profile, which appears as a banner at the top of the profile. We recommend that you do this to differentiate your profile and help it stand out. Visit the Help Center for information and steps for adding a background.
Location field
By default, your LinkedIn profile usually shows your geographic region and not the specific city you live in. LinkedIn divides all global areas into geographic regions. This gives members who may not be familiar with your area a better idea of where you’re located. Since you can edit your location, it is recommended that you select the geographic region (and the nearest, large metropolitan area) where you are targeting your search.
Industry field
For industry, you want to think of the industry you are targeting, not necessarily the industry you are in or your occupational title. For example, if choosing Marketing & Advertising, you are implying that you are seeking positions in marketing and advertising companies. The challenge for Project Management Professionals is that every industry has project managers (Project Management is not an industry), forcing you to narrow your industry to one. Recruiters and hiring managers use the industry category to search for candidates in specific fields. Recruiters and hiring managers use the industry category to search for candidates in specific fields.
To update the location and industry connected with your profile:
- Click the Me icon at the top of your LinkedIn homepage.
- Click View Profile
- Click the Edit icon next to your profile picture.
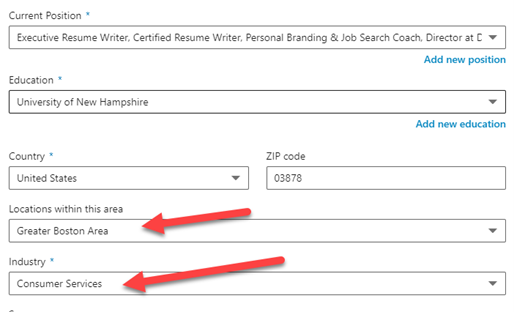
Location: Select your country from the dropdown and type in your postal code; select either a region or city.
Industry: Select an option from the Industry dropdown list. You must choose from the industries LinkedIn provides.
Industry Filter | Profile Industry Choices (148)
| ¨ Accounting | ¨ Airlines/Aviation | ¨ Alternative Dispute Resolution |
| ¨ Alternative Medicine | ¨ Animation | ¨ Apparel & Fashion |
| ¨ Architecture & Planning | ¨ Arts and Crafts | ¨ Automotive |
| ¨ Aviation & Aerospace | ¨ Banking | ¨ Biotechnology |
| ¨ Broadcast Media | ¨ Building Materials | ¨ Business Supplies & Equipment |
| ¨ Capital Markets | ¨ Chemicals | ¨ Civic & Social Organization |
| ¨ Civil Engineering | ¨ Commercial Real Estate | ¨ Computer & Network Security |
| ¨ Computer Games | ¨ Computer Hardware | ¨ Computer Networking |
| ¨ Consumer Goods | ¨ Consumer Services | ¨ Cosmetics |
| ¨ Dairy | ¨ Defense & Space | ¨ Design |
| ¨ E-Learning | ¨ Education Management | ¨ Electrical & Electronic Manufacturing |
| ¨ Entertainment | ¨ Environmental Services | ¨ Events Services |
| ¨ Executive Office | ¨ Facilities Services | ¨ Farming |
| ¨ Financial Services | ¨ Fine Art | ¨ Fishery |
| ¨ Food & Beverages | ¨ Food Production | ¨ Fund-Raising |
| ¨ Furniture | ¨ Gambling & Casinos | ¨ Glass, Ceramics & Concrete |
| ¨ Government Administration | ¨ Government Relations | ¨ Graphic Design |
| ¨ Health, Wellness & Fitness | ¨ Higher Education | ¨ Hospital & Healthcare |
| ¨ Hospitality | ¨ Human Resources | ¨ Import & Export |
| ¨ Individual & Family Services | ¨ Industrial Automation | ¨ Information Services |
| ¨ Information Technology & Services | ¨ Insurance | ¨ International Affairs |
| ¨ International Trade & Development | ¨ Internet | ¨ Investment Banking |
| ¨ Investment Management | ¨ Judiciary | ¨ Law Enforcement |
| ¨ Law Practice | ¨ Legal Services | ¨ Legislative Office |
| ¨ Leisure, Travel & Tourism | ¨ Libraries | ¨ Logistics and Supply Chain |
| ¨ Luxury Goods & Jewelry | ¨ Machinery | ¨ Management Consulting |
| ¨ Maritime | ¨ Market Research | ¨ Marketing and Advertising |
| ¨ Mechanical or Industrial Engineering | ¨ Media Production | ¨ Medical Devices |
| ¨ Medical Practice | ¨ Mental Health Care | ¨ Military |
| ¨ Mining & Metals | ¨ Mobile Game | ¨ Motion Pictures & Film |
| ¨ Museums and Institutions | ¨ Music | ¨ Nanotechnology |
| ¨ Newspapers | ¨ Nonprofit Organization Management | ¨ Oil & Energy |
| ¨ Online Media | ¨ Outsourcing/Offshoring | ¨ Package/Freight Delivery |
| ¨ Packaging and Containers | ¨ Paper & Forest Products | ¨ Performing Arts |
| ¨ Pharmaceuticals | ¨ Philanthropy | ¨ Photography |
| ¨ Plastics | ¨ Political Organization | ¨ Primary/Secondary Education |
| ¨ Printing | ¨ Professional Training & Coaching | ¨ Program Development |
| ¨ Public Policy | ¨ Public Relations and Communications | ¨ Public Safety |
| ¨ Publishing | ¨ Railroad Manufacture | ¨ Ranching |
| ¨ Real Estate | ¨ Recreational Facilities and Services | ¨ Religious Institutions |
| ¨ Renewables & Environment | ¨ Research | ¨ Restaurants |
| ¨ Retail | ¨ Security and Investigations | ¨ Semiconductors |
| ¨ Shipbuilding | ¨ Sporting Goods | ¨ Sports |
| ¨ Staffing and Recruiting | ¨ Supermarkets | ¨ Telecommunications |
| ¨ Textiles | ¨ Think Tanks | ¨ Tobacco |
| ¨ Translation and Localization | ¨ Transportation/Trucking/Railroad | ¨ Utilities |
| ¨ Venture Capital & Private Equity | ¨ Veterinary | ¨ Warehousing |
| ¨ Wholesale | ¨ Wine and Spirits | ¨ Wireless |
| ¨ Writing & Editing |
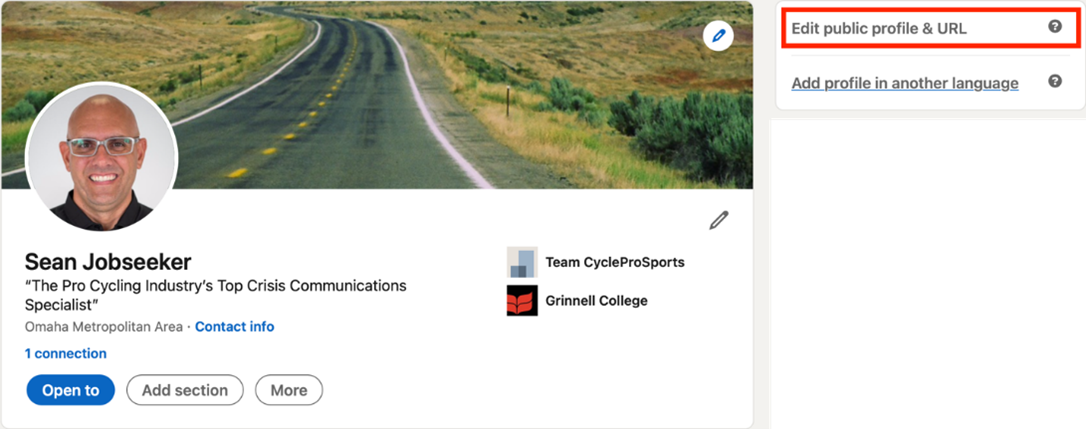
By default, LinkedIn assigns you a URL with random numbers and letters. For branding purposes, you will want to customize the URL associated with your profile. An easy-to-read URL address increases the chance of people being able to remember and find you on LinkedIn. You can also promote your custom signature link on your résumé, blog, Facebook page, business card, and through email signatures.
Customize your URL by clicking on the “Me” icon on the main menu bar. Click on the “View Profile” link.
At the top right of the page, click on “Edit public profile & URL.”
Click on that link and you’ll be taken to a page to review your public profile settings. In the upper right-hand corner, you can “Edit your custom URL” by clicking on the blue pencil icon.
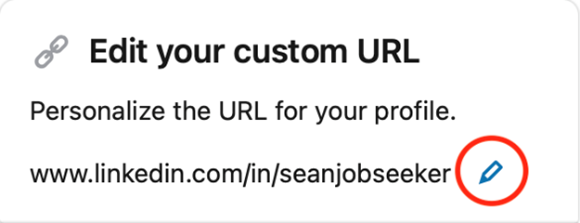
You can edit what appears after the standard www.linkedin.com/in/ domain. Your custom URL can contain between 3 and 100 letters or numbers (do not use spaces, symbols, or special characters, although you can use a hyphen).
LinkedIn will let you know if your custom URL is already in use by another LinkedIn account. Once you have selected your custom URL, click on the blue “Save” button and exit.
General information about the Summary
There are two positions on what voice to use when composing the About Summary. When used as a networking/relationship building tool, first-person voice (use of personal pronouns) has a friendly/conversational tone that reveals more of who you are. The majority of LinkedIn users and experts recommend this style, as do we, and this is how we have written your text.
On the other hand, some professionals choose to write in third-person (as if someone else is describing the individual), which is more business-like. If you prefer the more formal, third-person voice, then edit your summary by replacing all the personal pronouns “I” and “my” with your name.
Important reminder: Be sure all copy that ends up on LinkedIn keeps you free from the possibility of accidental indiscretion or unintended scrutiny, not to mention adherence to company policies.
When viewing a profile on the desktop, the first 4 lines of your About will appear as a “preview” below your headline and location when someone is viewing your profile before you need to click “more.” When someone is using the LinkedIn app on a mobile device, only the first 3 lines of your About will appear. The first 2-3 sentences need to instantly get your prospects interested in your profile—or, even better, get them excited about reading the rest of your profile.
Keywords are also important in the Summary. These play an important part for you in being found by people who don’t know you on LinkedIn—this is particularly true for jobseekers who are hoping for contacts from prospective employers and recruiters. Keywords are words and phrases that are related to your work—they are the words that a prospective employer would search for when trying to find someone like you.
You can also use asterisks, dashes, hyphens, and other keyboard characters to format the summary and make it easier to read. To add special characters/symbols easily, you may copy and paste from this list: ✓ ◊ ♦ ► ◄ ↔ ☆ ★ ♫ │ ▌
Adding/updating the About section
After the Headline, the most-often read section of your profile is the Summary (About section).
The Summary plays a significant role in LinkedIn, so take some time to decide what you will write. LinkedIn allows you a maximum of 2,600 characters in your About section. Use them wisely — and use as many as necessary to tell the story of you!
You can also use asterisks, dashes, hyphens, and other keyboard characters to format the Summary and make it easier to read. You can also include emojis — but be selective about which ones you use!
If you have an existing Summary, click the pencil icon on the right-hand side of the “About” section. This will allow you to edit the text (or replace it entirely).

It will open an “Edit about” window to add or update text.
You can include any contact information (phone, Google Voice, email, WhatsApp, Skype), your website URL, other social media handles, or even how to pronounce your name at the end of the Summary section, if desired.
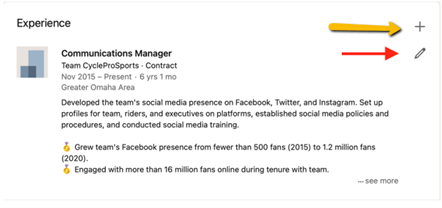
LinkedIn is a tool to find professionals FAST. The average recruiter skims a profile in 8.5 seconds. With that in mind, your Experience section needs to read fast.
The next step is to add or update your work experience. If you need to add a new position, click the blue “+” button in the “Experience” section. For existing Experience listed on your profile, click on the pencil icon to edit it.
This will open a new box for you to add your information. Don’t forget to scroll down and add a description.

Make sure the box for “Notify network” is set to “Off” so people in your network are not notified about the new position.
You can also add links to documents, photos, websites, videos, and presentations.
Be thorough in the education section. Each school/college/university listed enhances your networking reach. To add a college or university, click the blue “+” button in the “Education” section.
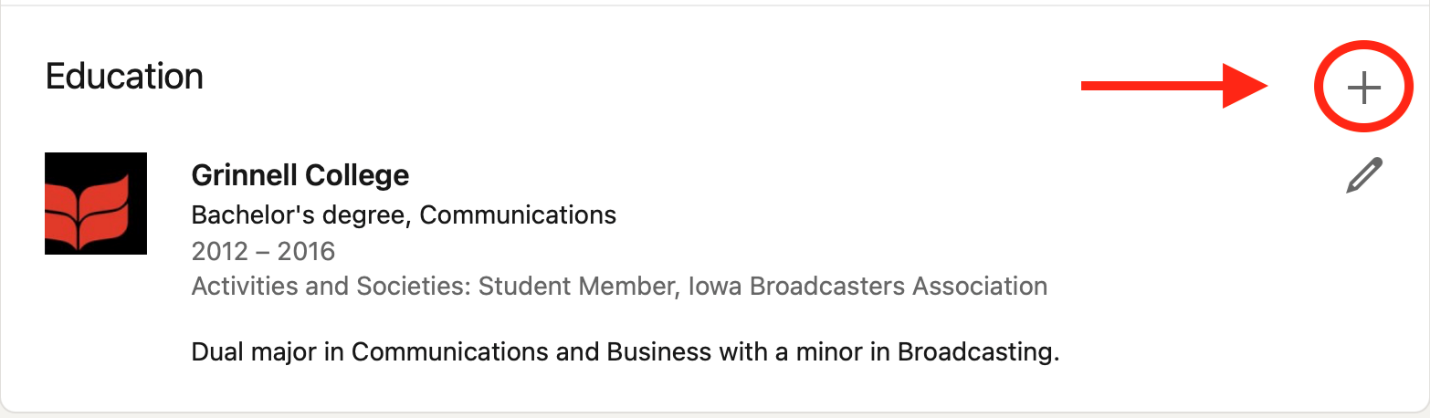
It will open a box for you to add your educational details. Make sure the box for “Notify network” is set to “Off” so people in your network are not notified about the added information. Be sure to scroll all the way down to fill in all the fields.

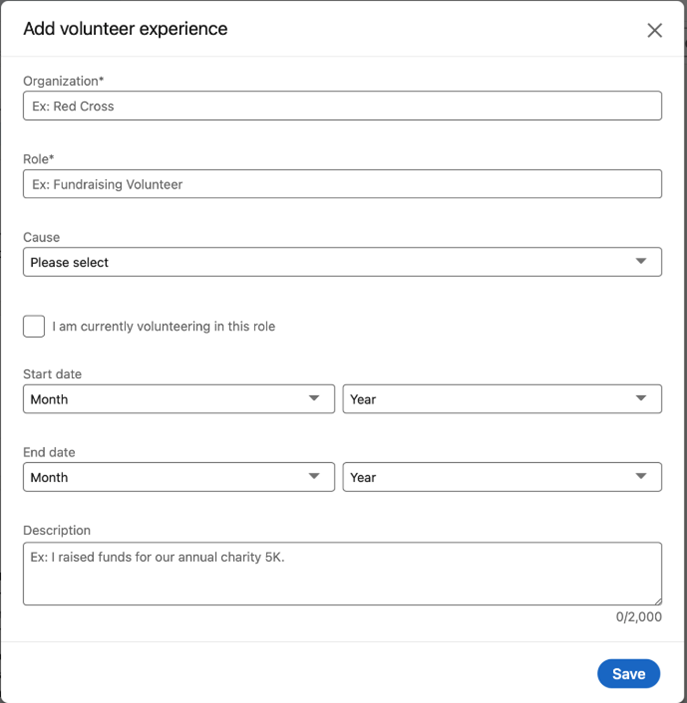
If possible, we recommend adding this section to your profile. Click on Add new profile section to the right of your snapshot area and click on Background to reveal the section title in the drop-down list.


Studies have shown that 1 in 5 managers consider a candidate’s volunteer experiences in their hiring decisions. If possible, we recommend adding this section to your profile. Click on Add new profile section to the right of your snapshot area and click on Background to reveal the section title in the drop-down list.

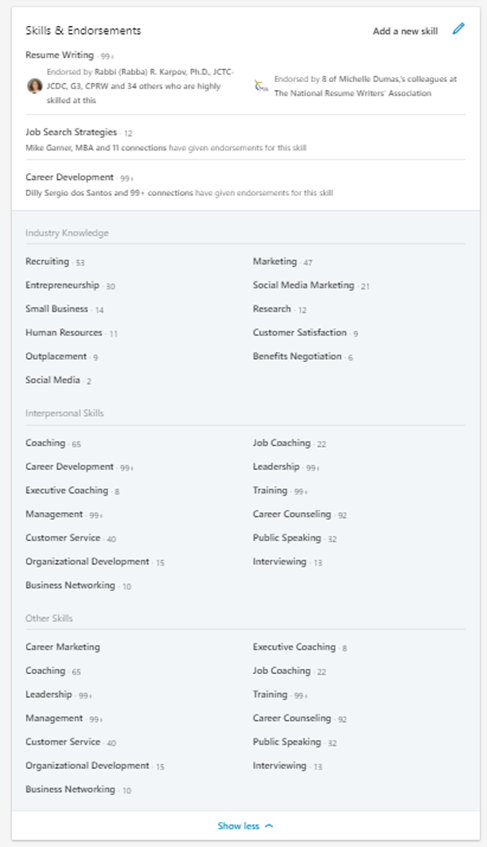
The Skills section is a great way to incorporate keywords into your profile. Along with your name, headline, summary, company name, and job title, the Skills section is one of the top sources of keywords used in searches.
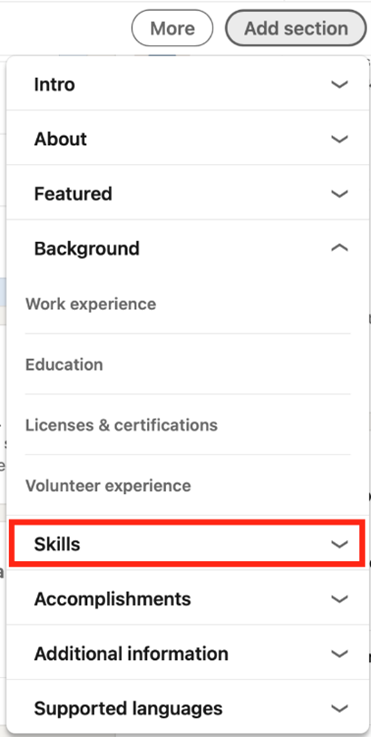
If you do not have a Skills section in your profile, you can add it.
![]()
Click on “Add section” and click on “Skills.” Then click on the “+” sign.
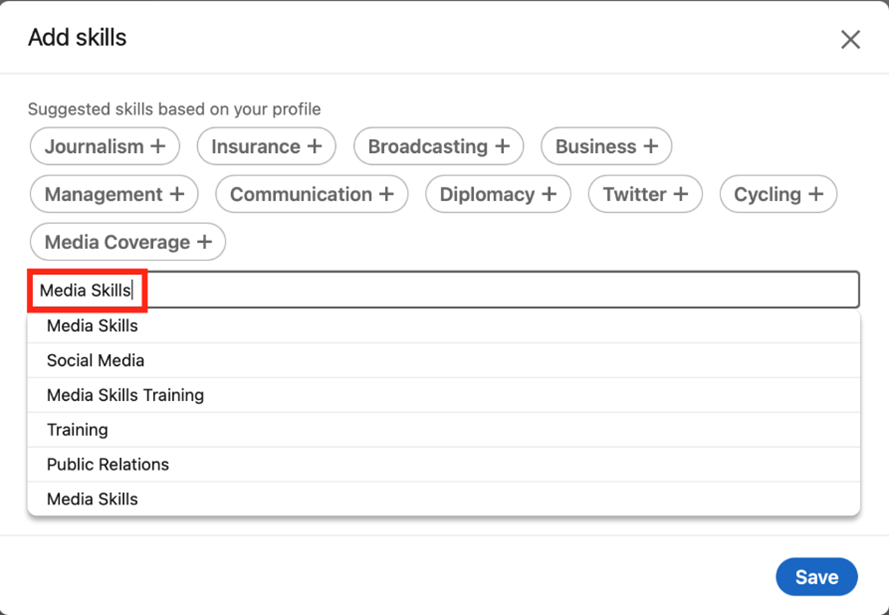
You will add Skills, one at a time: When you type in a Skill, LinkedIn will suggest a relevant keyword. If you use LinkedIn’s suggestions, that Skill is more likely to show up in searches. Stick to the thousands of skills LinkedIn already has in the system and your profile will pop up more often in search results.
You can add up to 50 Skills to your profile. You want to include as many Skills as you can, as it can help you be found by recruiters and hiring managers. Your contacts can endorse you for Skills. Skills with the most endorsements will be listed first by default. Skills without endorsements will be displayed according to when they were added.
You can also reorder the Skills by going to the “Skills & Endorsements” section of your profile. Click on the pencil in the upper right-hand corner and then click and drag on the Skill you want to move. (Click on the lines on the right-hand side.) As you reorder your Skills, consider their relevancy to your target job/industry and put the top 10 first.

If you need to remove any Skill, click the Edit icon and click the trashcan icon next to the Skill to remove it.
LinkedIn now divides your skills into subcategories, which produces a list broken into “Top 3,” “Industry Skills,” “Interpersonal Skills,” and “Other.” If you have a technology focus, it might also include “Technology Skills” as a subcategory.
Except for the top 3 skills, which you can selectively pin at the start of the section, you do not at this time have an opportunity to decide which category a skill goes into.
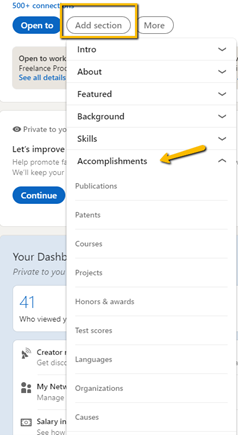
There are 9 additional sections you can add to your profile that are listed in the drop-down menu under Accomplishments (see the screenshot below). The more information you include in your Profile, the easier it is for recruiters and hiring managers to find you. Populating additional fields such as Publications, Courses, Projects, Honors & Awards, Patents, Test Scores, Languages, Organizations and Causes can boost the keywords that will help you be found on LinkedIn.
Note: If you add 2 or more items under any one section, LinkedIn automatically arranges the sections according to how many separate items are listed under each. You cannot rearrange these sections.

Note: LinkedIn does not show changes to publications to your network as they are made.
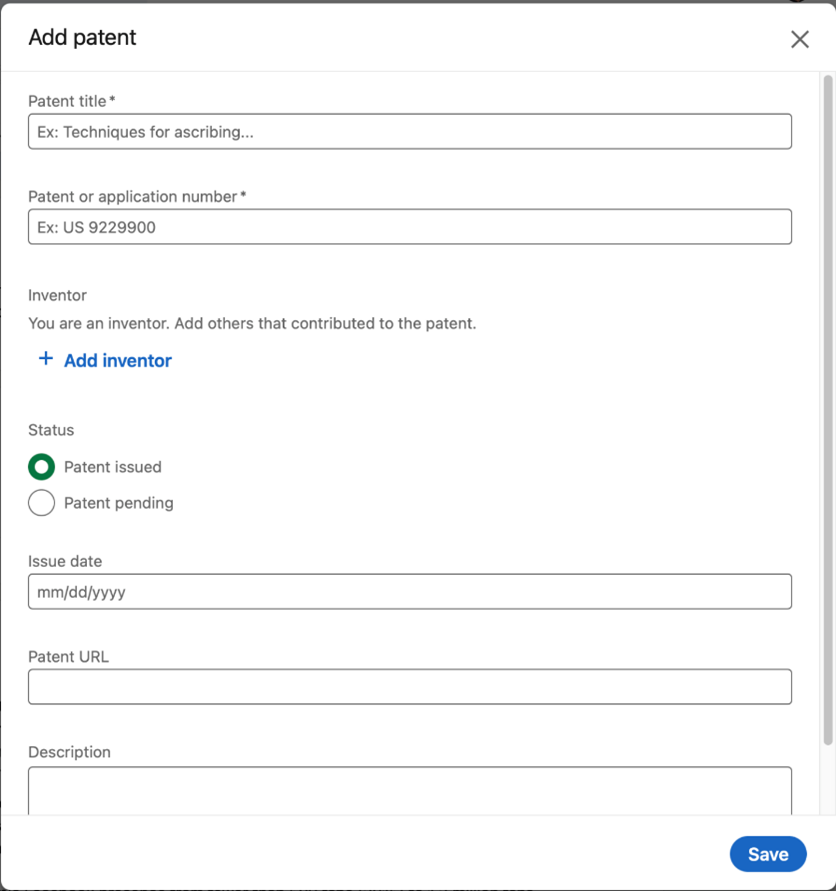
Note: LinkedIn does not show changes to patents to your network as they are made.
Courses
Courses add depth to your educational history and can include keywords to help your LinkedIn profile be found. On your profile page, click the “Add section” banner. Under “Accomplishments,” select “Courses.”
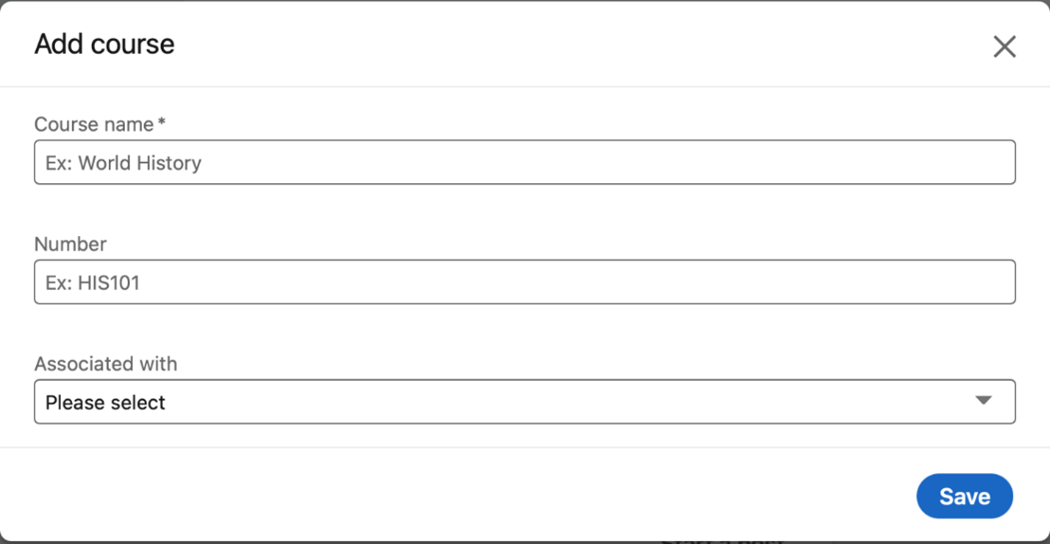
Note: LinkedIn does not show changes to courses to your network as they are made.
Projects
You will be able to add individual or team projects to your LinkedIn profile to highlight your competency. These can be related to your current or previous work experience, education or training, or even personal projects. On your profile page, click the “Add section” banner. Under “Accomplishments,” select “Projects.”
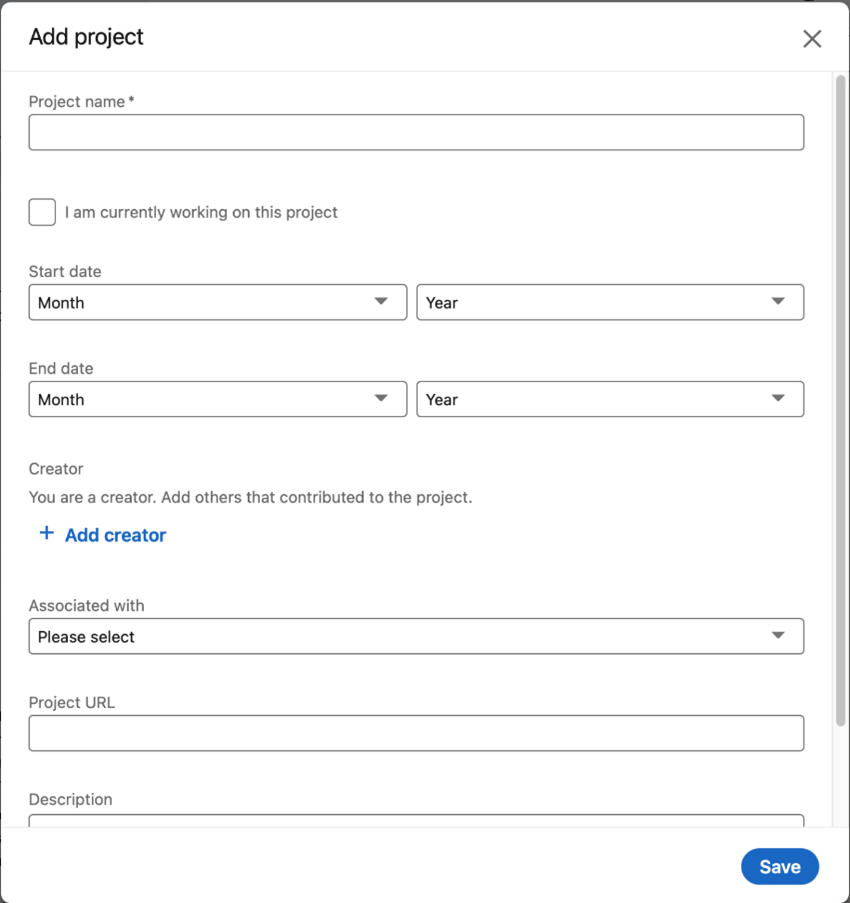
Note: LinkedIn does not show changes to projects to your network as they are made.
Honors & Awards
On your profile page, click the “Add section” banner. Under “Accomplishments,” select “Honors & Awards.”
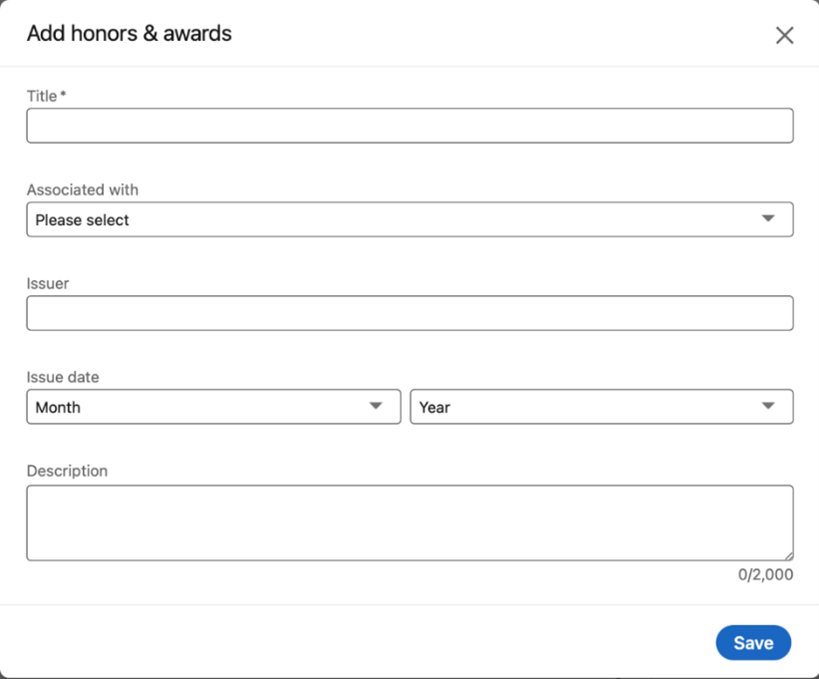
Note: LinkedIn does not show changes to honors and awards to your network as they are made.
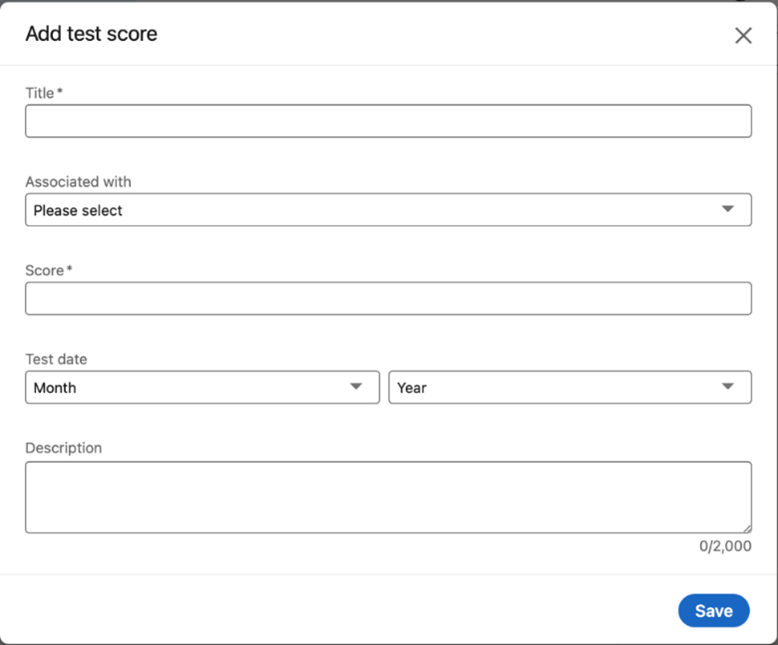
Test Scores
On your profile page, click the “Add section” banner. Under “Accomplishments,” select “Test Scores.”
Languages
On your profile page, click the “Add section” banner. Under “Accomplishments,” select “Languages.”
As you type into the “Language” box, it will auto-complete the word. Then, choose your proficiency level.

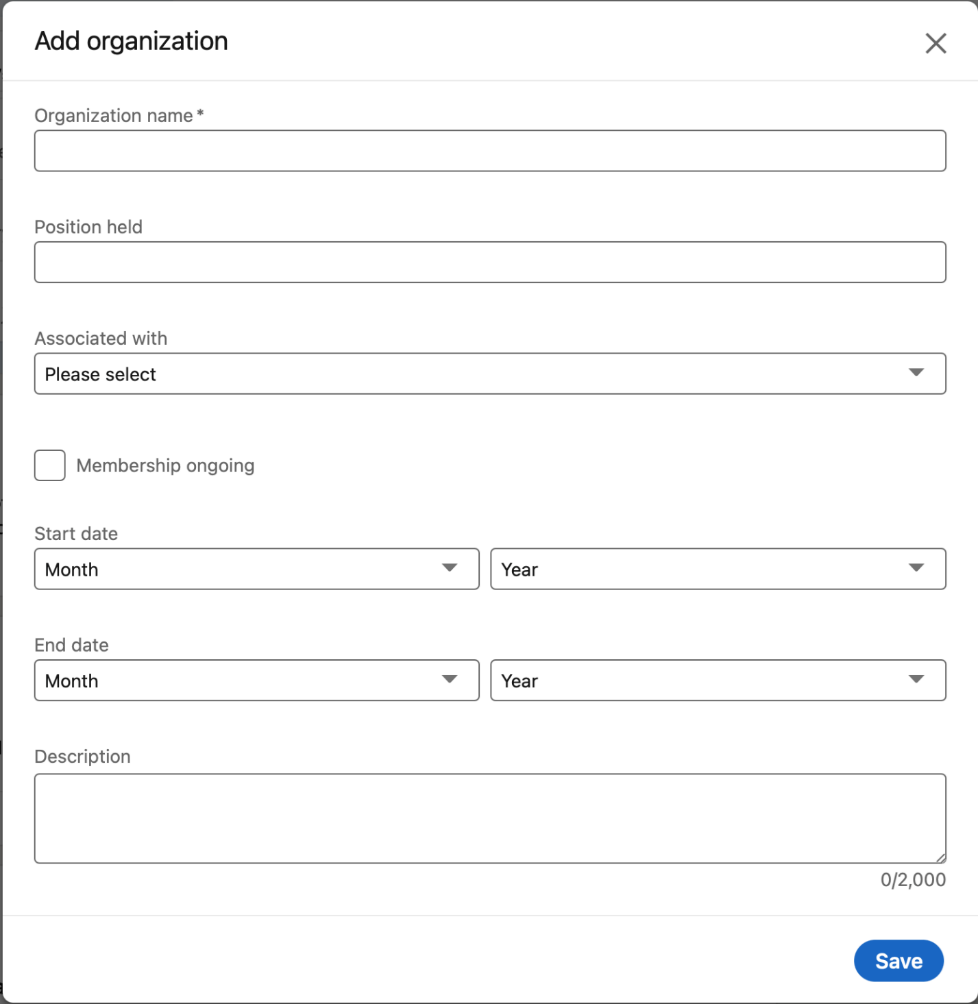
Organizations
On your profile page, click the “Add section” banner. Under “Accomplishments,” select “Organizations.”
Causes
On your profile page, click the “Add section” banner. Under “Accomplishments,” select “Causes.”
Choose the causes you care about from the list below.
Animal Welfare
Arts and Culture
Children
Civil Rights and Social Action
Disaster and Humanitarian Relief
Economic Empowerment
Education
Environment
Health
Human Rights
Politics
Poverty Alleviation
Science and Technology
Social Services
Veteran Support
Social Services
BACKUP YOUR COMPLETED PROFILE
Once you have completed your profile updates, be sure to download an updated copy. Using the menu bar at the top of the page, click “Me.” Click on the “View Profile” link on the drop-down page. This will take you to your profile page.
On your profile page, click on the “More” button and choose “Save to PDF” from the drop-down menu.
This will immediately save a PDF of your LinkedIn profile to the default download location on your computer. (Note: You may wish to rename this file if you don’t want to overwrite your previous backups.)
ADJUST YOUR PRIVACY & SETTINGS/VISIBILITY OF YOUR LINKEDIN ACTIVITY
On the main menu, below “Me,” click on “Settings & Privacy.”
On the “Settings & Privacy” page, click on the “Visibility” link on the left side of the page. Select the “Visibility of your LinkedIn activity” section.
Look for “Share profile updates with your network.” Click on the “Change” link next to that item.
On the drop-down that appears, slide the box to “Yes” in answer to “Should we notify your network when your profile is updated or upon work anniversaries?”
While you’re in the “Privacy & Settings” section, check and see how you’re appearing when you look at other people’s LinkedIn profiles. Click on the “Visibility” link on the left side of the page and choose “Visibility of your profile & network.”
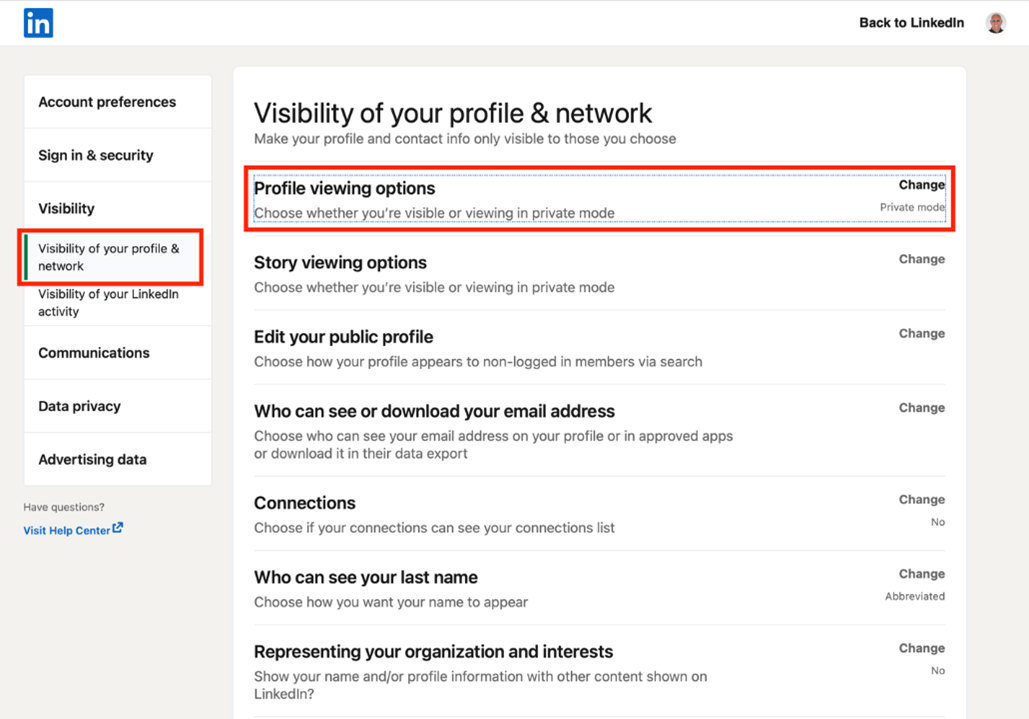
Then, under “Select what others see when you’ve viewed their profile,” choose the top option, “Your name and headline.”

CUSTOMIZE YOUR JOB SEEKER SETTINGS
Reference the supplemental document “LinkedIn Settings for Job Seekers” for important steps to complete that will increase your visibility with recruiters.
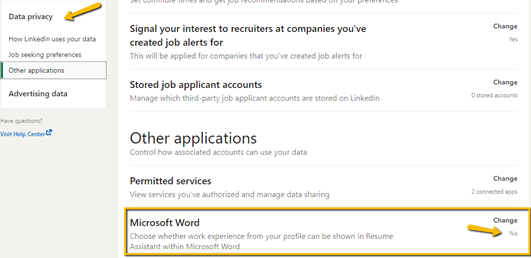
Recently, Microsoft and LinkedIn announced a new MS Word feature called Résumé Assistant. The idea is to make it easier for people to write résumés and LinkedIn profiles by showing them what other people in their roles say about themselves in their LinkedIn profiles.
Fortunately, LinkedIn seems to have realized that not everyone wants to make it easy for the competition to copy their profiles. They’ve introduced a new privacy setting that lets you exclude your profile from use by Résumé Assistant. I recommend turning the setting on and doing so right away.
How to Use the New LinkedIn Privacy Setting
- Click “Me.”
- Click “Settings & Privacy.”
- Click “ Data privacy.”
- Scroll down to “Other applications”
- Click “Microsoft Word.”
- Click the button from the default “Yes” to “No.”
- “Build it and they’ll come” does not always hold true with LinkedIn. To get the maximum benefit from LinkedIn, you MUST take the time to optimize your LinkedIn settings.
- Recommendations: Aim for a minimum of 3 per experience entry. See How to Give and Get LinkedIn Recommendations
- Status updates: Try to post at least one status update each week. You can easily post an update by sharing an article or blog post you read online.
- Multimedia elements: Upload slides, images, or video. You may even want to upload your biography or infographic value profile to the Summary section (In most cases, we don’t recommend uploading your resume).
- Groups: Join and participate in at least 5 (the more the better) occupation or industry Groups (select “Groups” from the dropdown menu by the search box, and key in relevant keywords to find groups that meet your criteria).
- Publish: Consider writing and publishing articles covering your area of professional expertise. LinkedIn offers this feature and includes helpful tips and advice on how to do so.
- Follow: Make sure to follow the company pages of prospective employers that interest you.
Congratulations… you are now ready to build your network and share your expertise!